Release Management (RM) Tool
Manage the release of your app by deploying it to a specific environment for each separate release step, and by controlling the process through approvals for each step.

RM Installation
Download Release Management Server, its client, and the deployment agent from VisualStudio.com and then install the server and client.
Important:This is a 90-day trial version of Release Management. For information about obtaining a non-trial version, see How to buy Release Management or Release Management Licensing. If you are an MSDN subscriber, you can download a non-trial version from the MSDN Subscriber website.
On computers that will make up the environments where you will deploy your release, install the deployment agent. These computers can be test, QA, or production environments.
Configure the Environment
The next step is to create the different environments to be used in the release path.- Go to Configure Paths
- Select Environments
- Click on "New"

Fill the general information form. Now, we have to link this environment to a server (remember, a server is a machine with the deployment agent installed).
- Click on Link existing.
Select the server and click on Link. Save the environment and repeat the operation for the QA and PROD environments.
After the environments are configured, we are ready to configure the release path. A release path is the path used for distributing the software. We can define as many paths as we need (standard, customer emergency, etc).
- Go to Configure Paths.
- Release Paths.
- click on New.
After filling the name and description of the release path, we are ready to configure the stages. Click on Add. Select the stage type from the Stage dropdown. Select the environment associated to the stage from the Environment dropdown. Each step is composed of 3 sequential steps:
Acceptance step: the user selected as the approver in the Approver dropdown will be the responsible for approving or rejecting the deployment of the release in the stage. This step can be automated by selecting the Automated check box.
Deployment step is composed of 2 parts: •Deployment of the components: the user selected as the approver in the Approver dropdown will have the responsibility of the deployment and he will be notified about it.
Validation of the deployment: the user selected as the validator in the Validator dropdown will have the reponsibility to validate that the components have been deployed correctly.
Apporval step: the users added to the Approvers list will have the responsibility to aprove or reject the release.
Repeat these steps for all four stages.

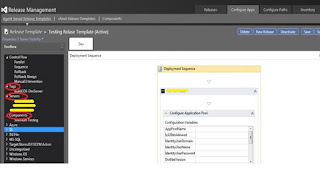
Create the Release Template
Configure the release template it will shows how to create the component and deploy the application.- Click on “ Configure Apps” tab.
- Select the “Agent based release template” Menu option.
- Click on “New” button and fill the basic information

Name: Name of the release template.
Description: Give the description of the new Release Template.
Release path Select the Release path from the dropdown.
Click on Edit button next to Build Definition textbox and select the build that the release will use.

Now fill this deployment sequence to be able to deploy MSI.to do this create the component for MSI Installation

Create the component for MSI installation
- Right click on "Components"
- Click on Add.
- Click on "New" button

In Source tab select the option which is used for your build.

In “Deployment tab” select the “MSI Deployer” Tool . Because we are deploying the application using the MSI. If you project using any other tool based upon you can choose to your tool from dropdown option.

In “Configuration variables” tab add the variables which will required for your component.

Tags: This is environment you are going to deploy the application.
Servers: These are the servers listed out in your environment.
Components: This component is used for install the MSI.


Installer: Mention the MSI name as argument.
build definition should use the releaseTemplate.

Set the Releaseproperty "TRUE".

Name: Mention the Name of the release.
ReleaseTemplate: Select the Release template name from drop down.
Build: Click on “Latest” link it should automatically select the latest build number builds successfully.
After fill the all the details click on “Start” button.
It triggered the build. It shows the log file of each and every action of the deployment.

once the Status was succeeded application successful deployed into the server

In “Deployment tab” select the “MSI Deployer” Tool . Because we are deploying the application using the MSI. If you project using any other tool based upon you can choose to your tool from dropdown option.

In “Configuration variables” tab add the variables which will required for your component.

Configure the Release Template

Tags: This is environment you are going to deploy the application.
Servers: These are the servers listed out in your environment.
Components: This component is used for install the MSI.


Installer: Mention the MSI name as argument.
build definition should use the releaseTemplate.

Set the Releaseproperty "TRUE".
Release the build
- Click on “Releases” tab
- Click on “Releases” Menu option.
- Click on “New” button.

Name: Mention the Name of the release.
ReleaseTemplate: Select the Release template name from drop down.
Build: Click on “Latest” link it should automatically select the latest build number builds successfully.
After fill the all the details click on “Start” button.
It triggered the build. It shows the log file of each and every action of the deployment.

once the Status was succeeded application successful deployed into the server