Thursday, June 9, 2016

Configuring Postgresql on Openstack environment

Changing the password for Postgresql

  1. sudo -u postgres psql
    • Access the postgresql with the default user postgres with (sudo)'root' credential
  2. ALTER USER postgres PASSWORD 'newpassword';
    • This command will reset the password for the specified user name 'postgres'
    • The same command can be used to reset any of the User who has forgotten their password
Access Postgresql from Openstack - Linux
  1. psql -U postgres -h localhost
    • This will connect to the default database 'postgres' which is available in the same instance as we have provided 'localhost' for '-h' after providing your password
    • If incase you want to connect to another database other than your default database then you can specify the database to the end of this command as mentioned below
      • psql -U postgres -h localhost NewDatabase
  2. By default, we will only have postgres as the database in any new instance. To create a new database you can use the command provided above to connect to 'postgres' database. Once you get connected to database you should see the screen displaying the database name as 'postgres=#'.
    • Create Database NewDatabase;
  3. After the database is created you can connect to that NewDatabase and perform all other database functions.
Configuring postgres to allow accessing with the IP address

Postgresql will by default be accessed by providing localhost as the hostname. To enable connecting using the IP address, you must follow the below steps,

1.     Modify the postgresql.conf file listen addresses
To modify the postgresql.conf file:
a.     Open a Terminal window
b.    su - postgres
c.     Type cd  /usr/local/pgsql/bin

Note:  Depending on your install environment the path may vary. You can also try to check the folder path '/var/lib/pgsql/'

d.    Type  ./pg_ctl stop -D /usr/local/pgsql/data -m smart to stop PostgreSQL. 

Where the path listed after –D is the path to the data directory

If this doesnt work, you can also try the below command

            sudo systemctl stop postgresql.service

e.     Update the /usr/local/pgsql/data/postgresql.conf file. 

Example:  vi /usr/local/pgsql/data/postgresql.conf

f.      Search for the line #listen_addresses = 'local_host'
g.    Edit the value to ‘*’ this will start postmaster with the TCP/IP connectivity option.

Example:  listen_addresses = '*' 

Note:  If you are using vi as the editor press i to insert text
Note:  This has the PostgreSQL engine listening to any TCP/IP sockets. You need to setup the permission for the specific TCP/IP address you are to connect.
h.     Save the changes. 

Note:   If you are using vi as the editor press to insert then press :wq! to save the changes.

2.     Verify  the pg_hba.conf file has authentication set to trust
This solution will verify that the authentication method used by PostgreSQL set to trust, which will allow anyone who is authorized to access the PostgreSQL server to connect to the database.
To verify the pg_hba.conf file set to allow trust authentication:
a.     Open a Terminal window
b.    su - postgres
c.     Type cd  /usr/local/pgsql/data

Note:  Depending on your install environment the path may vary

d.    Update the /usr/local/pgsql/data/pg_hba.conf file to allow TCP/IP connectivity to the database.

Example:  vi /usr/local/pgsql/data/pg_hba.conf

e.     Verify the host entry as shown below.  It should be set to trust and not md5.

host     all        all        127.0.0.1/32      trust    
 Note:  If you are not using localhost to connect to PostgreSQL  and will instead be using the hostname, you will need to add an entry for the associated IP for the hostname.  See example below.

Example :
Add the following entry to the bottom of the file
host     all        all        x.x.x.x/32          trust    
Where the x.x.x.x is the IP address of the target machine. This line allows all users on the target machine to connect to PostgreSQL. You can adjust the configuration to map to the standards within your organization.
f.     Restart PostgreSQL
a.     Cd to /usr/local/pgsql/bin
b.    Enter ./pg_ctl start -D /usr/local/pgsql/data start

Saturday, January 16, 2016

Release Management Tool from Microsoft for CICD

Release Management (RM) Tool
Manage the release of your app by deploying it to a specific environment for each separate release step, and by controlling the process through approvals for each step.
RM Installation

Download Release Management Server, its client, and the deployment agent from VisualStudio.com and then install the server and client.
Important:This is a 90-day trial version of Release Management. For information about obtaining a non-trial version, see How to buy Release Management or Release Management Licensing. If you are an MSDN subscriber, you can download a non-trial version from the MSDN Subscriber website.
On computers that will make up the environments where you will deploy your release, install the deployment agent. These computers can be test, QA, or production environments.

Configure the Environment

The next step is to create the different environments to be used in the release path.
  • Go to Configure Paths
  • Select Environments
  • Click on "New"

Fill the general information form. Now, we have to link this environment to a server (remember, a server is a machine with the deployment agent installed).
  • Click on Link existing.
Select the server and click on Link. Save the environment and repeat the operation for the QA and PROD environments.
After the environments are configured, we are ready to configure the release path. A release path is the path used for distributing the software. We can define as many paths as we need (standard, customer emergency, etc).
  • Go to Configure Paths.
  • Release Paths.
  • click on New.
After filling the name and description of the release path, we are ready to configure the stages. Click on Add. Select the stage type from the Stage dropdown. Select the environment associated to the stage from the Environment dropdown. Each step is composed of 3 sequential steps:
Acceptance step: the user selected as the approver in the Approver dropdown will be the responsible for approving or rejecting the deployment of the release in the stage. This step can be automated by selecting the Automated check box.
Deployment step is composed of 2 parts: •Deployment of the components: the user selected as the approver in the Approver dropdown will have the responsibility of the deployment and he will be notified about it.
Validation of the deployment: the user selected as the validator in the Validator dropdown will have the reponsibility to validate that the components have been deployed correctly.
Apporval step: the users added to the Approvers list will have the responsibility to aprove or reject the release.
Repeat these steps for all four stages.


Create the Release Template

Configure the release template it will shows how to create the component and deploy the application.
  • Click on “ Configure Apps” tab.
  • Select the “Agent based release template” Menu option.
  • Click on “New” button and fill the basic information

Name: Name of the release template.
Description: Give the description of the new Release Template.
Release path Select the Release path from the dropdown.
Click on Edit button next to Build Definition textbox and select the build that the release will use.

Now fill this deployment sequence to be able to deploy MSI.to do this create the component for MSI Installation

Create the component for MSI installation

  • Right click on "Components"
  • Click on Add.
  • Click on "New" button

In Source tab select the option which is used for your build.


In “Deployment tab” select the “MSI Deployer” Tool . Because we are deploying the application using the MSI. If you project using any other tool based upon you can choose to your tool from dropdown option.


In “Configuration variables” tab add the variables which will required for your component.


Configure the Release Template


Tags: This is environment you are going to deploy the application.
Servers: These are the servers listed out in your environment.
Components: This component is used for install the MSI.


Installer: Mention the MSI name as argument.
build definition should use the releaseTemplate.


Set the Releaseproperty "TRUE".

Release the build

  • Click on “Releases” tab
  • Click on “Releases” Menu option.
  • Click on “New” button.


Name: Mention the Name of the release.
ReleaseTemplate: Select the Release template name from drop down.
Build: Click on “Latest” link it should automatically select the latest build number builds successfully.
After fill the all the details click on “Start” button.

It triggered the build. It shows the log file of each and every action of the deployment.


once the Status was succeeded application successful deployed into the server


XML Preprocess and its usage for configuration management

What is XML Preprocess?

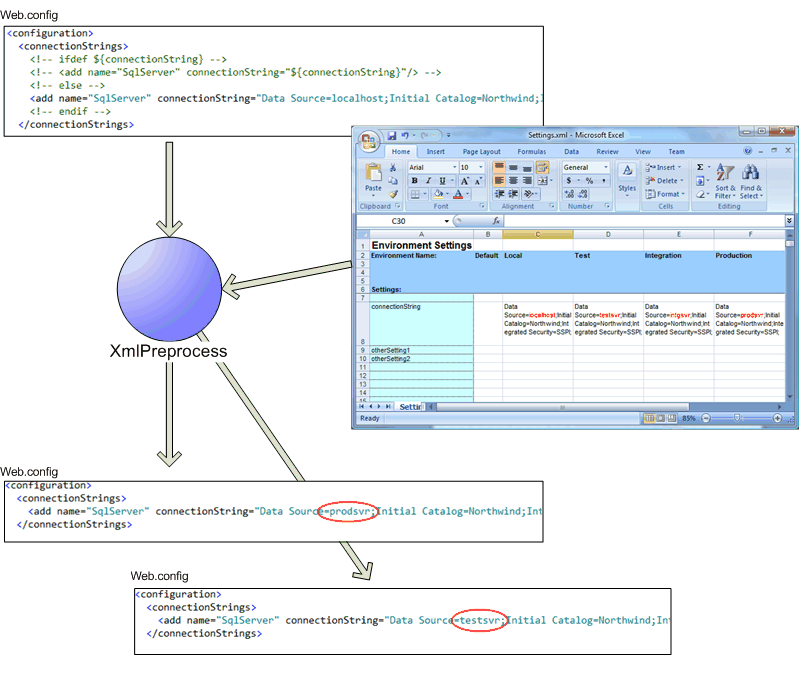
XmlPreprocess is a command-line utility that can modify annotated XML files much like a code preprocessor. It is useful for deploying configuration files to different environments making substitutions such as connection strings. It is easily integrated into almost any script, build tool or deployment package to simplify and centralize your deployment strategy.

Goals

  1. Single source of truth - Avoid maintaining parallel copies of configuration files, templates or transforms of configuration files for each environment. This eliminates the "getting out of sync" problem experienced when developers need to add something to configuration and forget to update it in several places.
  2. Get and Go - Keep the configuration files fully operational right out of source control. Ideally, developers should be able to get the file directly from source control and run without having to touch it up for their local development environment. This is accomplished by decorating the configuration files with non-breaking XML comments that contain instructions for the preprocessor. These comments lay dormant, invisible to the configuration system, allowing reasonable development defaults to be used in the file. The comments are only used by the preprocessor at deployment-time.
  3. Central Configuration Management - Provide a single, central place to manage all configuration settings for the entire system without needing to know anything about where the settings go, nor having to edit XML. The Excel spreadsheet is an easy-to-use tool for anyone, including non-developers to manage all of your configuration settings. If you don’t want to use Excel, version 2.0.15 has added new data sources such as CSV files, databases, and custom data sources where you can store and manage them however you want.


Examples

For example if you want to turn debug page compilation off when in production, you might do something like this:


The debug setting will remain true for an unprocessed file, but when this file is deployed using the XmlPreprocess tool with the "production" property defined, the ifdef condition will be tested, and if true, the comments around its body content will be removed, and the else branch will be omitted entirely. This will render the following:


Another powerful way to use the preprocessor is to substitute properties into placeholders in your XML file much like in Ant or NAnt. Properties can be defined in an external XML file or passed on the command line to XmlPreprocess.exe.
For example if you have an application setting that contains the name of a remote server, but the name of that server changes from environment to environment, you may want to mark-up your XML like this:


EntityFramework Reverse POCO Generator

Reverse engineers an existing database and generates EntityFramework Code First POCO classes, Configuration mappings and DbContext. Includes support for WCF. Works for SQL Server and SQL Server Compact 4.0

Link for further details on this Reverse POCO- https://visualstudiogallery.msdn.microsoft.com/ee4fcff9-0c4c-4179-afd9-7a2fb90f5838

Thursday, October 3, 2013

BCP utility for data importing

With UserId/Pwd
bcp pubs.dbo.authors out c: emppubauthors.bcp –n –Sstevenw –Usa –P
bcp pubs2.dbo.authors in c: emppubauthors.bcp –n –Sstevenw –Usa –P

For Trusted
bcp pubs.dbo.authors out c: emppubauthors.bcp –n –Sstevenw –T
bcp pubs2.dbo.authors in c: emppubauthors.bcp –n –Sstevenw –T

*-S - Server Name -U - User Name -P Pwd

Tuesday, January 29, 2013

Get the list of Stored Procs related to a table

SELECT DISTINCT so.name FROM syscomments sc INNER JOIN sysobjects so ON sc.id=so.id WHERE sc.TEXT LIKE '%tablename%'

Tuesday, August 31, 2010

How to use SqlDataSource SelectCommand in the backend

This Tutorial is not for those who need to plugin the sqldatasource in the front end, but rather how to use the SqlDataSource in the backend codes.

There are tons of tutorial of how to write SqlDataSource for Gridview, DataList, Repeater and other objects in the front end (aspx file), but not many tutorials out there on how to simplify things for using SqlDataSource in the backend (aspx.cs file).

Example:

you have a gridview called “gvStudents”, and you have a sql query “SELECT * FROM Students”. you want to bind the query to the gridview but you want to do it in the backend. How do you do it?

here is how you do it.

SqlDataSource SDSStudents = new SqlDataSource();
SDSStudents.SelectCommand = “SELECT * FROM Students”;
SDSStudents.ConnectionString = ConfigurationManager.ConnectionStrings["YourConnectStringName"].ConnectionString;

gvStudents.DataSource = SDSStudents;
gvStudents.DataBind();

5 Simple Steps
1) Create a new SqlDataSource object
2) Assign the SQL Query to the Select Command
3) Assign the ConnectionString to the SqlDataSource ConnectionString
4) Assign the SqlDataSource to the gridview DataSource
5) DataBind the gridview

I know your next question is “What about Stored Procedure? Can I do the same thing with a stored procedure?”

The answer is Yes, you can do the same thing with a stored procedure. here is how

SqlDataSource SDSStudents = new SqlDataSource();
SDSStudents.SelectCommand = “Stored Procedure Name”;
SDSStudents.SelectCommandType = SqlDataSourceCommandType.StoredProcedure;
SDSStudents.ConnectionString = ConfigurationManager.ConnectionStrings["YourConnectStringName"].ConnectionString;

gvStudents.DataSource = SDSStudents;
gvStudents.DataBind();

Instead of 5 Simple Steps, it is now 6 simple steps
6 Simple Steps
1) Create a new SqlDataSource object
2) Assign the SQL stored procedure name to the Select Command
3) Set the SqlCommandType to be a StoredProcedure
4) Assign the ConnectionString to the SqlDataSource ConnectionString
5) Assign the SqlDataSource to the gridview DataSource
6) DataBind the gridview


I bet your next answer is “What about SelectCommand Parameters? Can I Add Parameters to the SqlDataSource?”

*Updated*
Instead of writing another entry, I decided to continue with this entry and answer the question about the Parameters inside the SqlDataSource.

Yes you can add parameter in the SelectCommand, either the select command is sql query or stored procedure.
This is how you do it.

SqlDataSource SDSStudents = new SqlDataSource();
SDSStudents.SelectCommand = “SELECT * FROM Students WHERE ID=@ID”;
SDSStudents.SelectParameters.Add(“ID”, TypeCode.Int32, “1″);
SDSStudents.ConnectionString = ConfigurationManager.ConnectionStrings["YourConnectStringName"].ConnectionString;
gvStudents.DataSource = SDSStudents;
gvStudents.DataBind();


If using with Stored Procedure use this,

SqlDataSource SDSStudents = new SqlDataSource();
SDSStudents.SelectCommand = “Stored Procedure Name”;
SDSStudents.SelectCommandType = SqlDataSourceCommandType.StoredProcedure;
SDSStudents.ConnectionString = ConfigurationManager.ConnectionStrings["YourConnectStringName"].ConnectionString;

SDSStudents.SelectParameters.Clear();
SDSStudents.SelectParameters.Add("Param1", strParamVal1);
SDSStudents.SelectParameters.Add("Param2", strParamVal2);

if (SDSStudents.SelectParameters["Param1"].DefaultValue == null || SDSStudents.SelectParameters["Param1"].DefaultValue == "")
SDSStudents.SelectParameters["Param1"].DefaultValue = " ";

if (SDSStudents.SelectParameters["Param2"].DefaultValue == null || SDSStudents.SelectParameters["Param2"].DefaultValue == "")
SDSStudents.SelectParameters["Param2"].DefaultValue = " ";


gvStudents.DataSource = SDSStudents;
gvStudents.DataBind();

Instead of 5 Simple Steps for the sqlquery, it is now 6 simple steps
6 Simple Steps
1) Create a new SqlDataSource object
2) Assign the SQL Query to the Select Command
3) using SelectParamters.Add(“ParameterName”, DBType or TypeCode, “ParameterValue”) to add new parameter to the selectCommand
4) Assign the ConnectionString to the SqlDataSource ConnectionString
5) Assign the SqlDataSource to the gridview DataSource
6) DataBind the gridview

Wednesday, June 16, 2010

Crystal Report Binding With Parameters From C#

This script can be used when you want to bind a Crystal Report with Stored Procedure and want to pass some parameters to the report. These parameters can be in SubReport also. The parameters get assigned for the respective subreports and main report if the Parameter name differs.

The major use of this code is it would not ask for the login details while showing the report. The Login details are set based on the App.Config connection which is Global across the Application.


TableLogOnInfos myTableLogOnInfos = new TableLogOnInfos();
TableLogOnInfo myTableLogOnInfo = new TableLogOnInfo();
ConnectionInfo myConnectionInfo = new ConnectionInfo();

//Set Database Connection Details
string[] arrConn = System.Configuration.ConfigurationSettings.AppSettings["ConnectionString"].Split(';');

for (int i = 0; i < arrConn.Length; i++)
{
string[] arrServer = arrConn[i].Split('=');
if (arrServer[0].ToLower().Trim() == "server" || arrServer[0].ToLower().Trim() == "data source")
myConnectionInfo.ServerName = arrServer[1];
if (arrServer[0].ToLower().Trim() == "database" || arrServer[0].ToLower().Trim() == "initial catalog")
myConnectionInfo.DatabaseName = arrServer[1];
if (arrServer[0].ToLower().Trim() == "userId" || arrServer[0].ToLower().Trim() == "user id")
myConnectionInfo.UserID = arrServer[1];
if (arrServer[0].ToLower().Trim() == "Password" || arrServer[0].ToLower().Trim() == "pwd")
myConnectionInfo.Password = arrServer[1];
}

//This Code is used to Get the Reportname based on the namespace. This code can be used globally across the application. If you can pass the Report Name directly then this piece of code wont be necessary

//Get the Report Source Name
String sFormName = UIGlobal.ReportName;
Assembly objAssembly = AppDomain.CurrentDomain.Load(UIGlobal.RptNamespaceName); ;
object objForm = null;
foreach (Type t in objAssembly.GetTypes())
{
if (t.Name.ToUpper() == sFormName.ToUpper())
{
objForm = Activator.CreateInstance(t);
break;
}
}
if (objForm != null)
{
rptDoc = (ReportDocument)objForm;

foreach (Table t in rptDoc.Database.Tables)
{
TableLogOnInfo tl = t.LogOnInfo;
tl.ConnectionInfo = myConnectionInfo;
t.ApplyLogOnInfo(tl);
}

rptDoc.Refresh();

//Set Log On Info
myTableLogOnInfo.ConnectionInfo = myConnectionInfo;
myTableLogOnInfos.Add(myTableLogOnInfo);
rptStorage.LogOnInfo = myTableLogOnInfos;
rptStorage.Refresh();

if (strParamName != null && strParamName.Length > 0 && strParamValue != null && strParamValue.Length > 0)
{
int cnt = rptDoc.DataDefinition.ParameterFields.Count;
for (int i = 0; i < cnt; i++)
{
ParameterValues myvals = new ParameterValues();
ParameterDiscreteValue myDiscrete = new ParameterDiscreteValue();

ArrayList arParams = new ArrayList();
arParams.AddRange(strParamName);

if (arParams.Contains(rptDoc.DataDefinition.ParameterFields[i].ParameterFieldName.ToUpper()))
{
for (int iCnt = 0; iCnt < strParamName.Length; iCnt++)
{
if (strParamName[iCnt] == rptDoc.DataDefinition.ParameterFields[i].ParameterFieldName.ToUpper())
{
myDiscrete.Value = strParamValue[iCnt];
myvals.Add(myDiscrete);
rptDoc.DataDefinition.ParameterFields[i].ApplyCurrentValues(myvals);
}
}
}
}
}
rptStorage.ReportSource = rptDoc;
}

Tuesday, June 8, 2010

Disable Buttons in a Button Column in the Windows Forms DataGridView

public void Form1_Load(object sender, EventArgs e)
{
DataGridViewCheckBoxColumn column0 =
new DataGridViewCheckBoxColumn();
DataGridViewDisableButtonColumn column1 =
new DataGridViewDisableButtonColumn();
column0.Name = "CheckBoxes";
column1.Name = "Buttons";
dataGridView1.Columns.Add(column0);
dataGridView1.Columns.Add(column1);
dataGridView1.RowCount = 8;
dataGridView1.AutoSize = true;
dataGridView1.AllowUserToAddRows = false;
dataGridView1.ColumnHeadersDefaultCellStyle.Alignment =
DataGridViewContentAlignment.MiddleCenter;

// Set the text for each button.
for (int i = 0; i < dataGridView1.RowCount; i++)
{
dataGridView1.Rows[i].Cells["Buttons"].Value =
"Button " + i.ToString();
}

dataGridView1.CellValueChanged +=
new DataGridViewCellEventHandler(dataGridView1_CellValueChanged);
dataGridView1.CurrentCellDirtyStateChanged +=
new EventHandler(dataGridView1_CurrentCellDirtyStateChanged);
dataGridView1.CellClick +=
new DataGridViewCellEventHandler(dataGridView1_CellClick);

this.Controls.Add(dataGridView1);
}

// This event handler manually raises the CellValueChanged event
// by calling the CommitEdit method.
void dataGridView1_CurrentCellDirtyStateChanged(object sender,
EventArgs e)
{
if (dataGridView1.IsCurrentCellDirty)
{
dataGridView1.CommitEdit(DataGridViewDataErrorContexts.Commit);
}
}

// If a check box cell is clicked, this event handler disables
// or enables the button in the same row as the clicked cell.
public void dataGridView1_CellValueChanged(object sender,
DataGridViewCellEventArgs e)
{
if (dataGridView1.Columns[e.ColumnIndex].Name == "CheckBoxes")
{
DataGridViewDisableButtonCell buttonCell =
(DataGridViewDisableButtonCell)dataGridView1.
Rows[e.RowIndex].Cells["Buttons"];

DataGridViewCheckBoxCell checkCell =
(DataGridViewCheckBoxCell)dataGridView1.
Rows[e.RowIndex].Cells["CheckBoxes"];
buttonCell.Enabled = !(Boolean)checkCell.Value;

dataGridView1.Invalidate();
}
}

// If the user clicks on an enabled button cell, this event handler
// reports that the button is enabled.
void dataGridView1_CellClick(object sender,
DataGridViewCellEventArgs e)
{
if (dataGridView1.Columns[e.ColumnIndex].Name == "Buttons")
{
DataGridViewDisableButtonCell buttonCell =
(DataGridViewDisableButtonCell)dataGridView1.
Rows[e.RowIndex].Cells["Buttons"];

if (buttonCell.Enabled)
{
MessageBox.Show(dataGridView1.Rows[e.RowIndex].
Cells[e.ColumnIndex].Value.ToString() +
" is enabled");
}
}
}
}

public class DataGridViewDisableButtonColumn : DataGridViewButtonColumn
{
public DataGridViewDisableButtonColumn()
{
this.CellTemplate = new DataGridViewDisableButtonCell();
}
}

public class DataGridViewDisableButtonCell : DataGridViewButtonCell
{
private bool enabledValue;
public bool Enabled
{
get
{
return enabledValue;
}
set
{
enabledValue = value;
}
}

// Override the Clone method so that the Enabled property is copied.
public override object Clone()
{
DataGridViewDisableButtonCell cell =
(DataGridViewDisableButtonCell)base.Clone();
cell.Enabled = this.Enabled;
return cell;
}

// By default, enable the button cell.
public DataGridViewDisableButtonCell()
{
this.enabledValue = true;
}

protected override void Paint(Graphics graphics,
Rectangle clipBounds, Rectangle cellBounds, int rowIndex,
DataGridViewElementStates elementState, object value,
object formattedValue, string errorText,
DataGridViewCellStyle cellStyle,
DataGridViewAdvancedBorderStyle advancedBorderStyle,
DataGridViewPaintParts paintParts)
{
// The button cell is disabled, so paint the border,
// background, and disabled button for the cell.
if (!this.enabledValue)
{
// Draw the cell background, if specified.
if ((paintParts & DataGridViewPaintParts.Background) ==
DataGridViewPaintParts.Background)
{
SolidBrush cellBackground =
new SolidBrush(cellStyle.BackColor);
graphics.FillRectangle(cellBackground, cellBounds);
cellBackground.Dispose();
}

// Draw the cell borders, if specified.
if ((paintParts & DataGridViewPaintParts.Border) ==
DataGridViewPaintParts.Border)
{
PaintBorder(graphics, clipBounds, cellBounds, cellStyle,
advancedBorderStyle);
}

// Calculate the area in which to draw the button.
Rectangle buttonArea = cellBounds;
Rectangle buttonAdjustment =
this.BorderWidths(advancedBorderStyle);
buttonArea.X += buttonAdjustment.X;
buttonArea.Y += buttonAdjustment.Y;
buttonArea.Height -= buttonAdjustment.Height;
buttonArea.Width -= buttonAdjustment.Width;

// Draw the disabled button.
ButtonRenderer.DrawButton(graphics, buttonArea,
PushButtonState.Disabled);

// Draw the disabled button text.
if (this.FormattedValue is String)
{
TextRenderer.DrawText(graphics,
(string)this.FormattedValue,
this.DataGridView.Font,
buttonArea, SystemColors.GrayText);
}
}
else
{
// The button cell is enabled, so let the base class
// handle the painting.
base.Paint(graphics, clipBounds, cellBounds, rowIndex,
elementState, value, formattedValue, errorText,
cellStyle, advancedBorderStyle, paintParts);
}
}
}

Thursday, May 20, 2010

SQL Script for creating a New Database with Security Login and Password

////Create a new database, if does not exist
if db_id('DBNAME') is null
begin
create database [DBNAME]
end

=====================================================================================
////Once the Database is Created we can create the User login for this Database

////If user does not exist
if DATABASE_PRINCIPAL_ID('[DBNAME]') is null
begin
use [DBNAME]
if DATABASE_PRINCIPAL_ID('USERNAME') is null
CREATE LOGIN [USERNAME]
WITH PASSWORD='PASSWORD',
DEFAULT_DATABASE=[DBNAME],
DEFAULT_LANGUAGE=[us_english],
CHECK_EXPIRATION=OFF,
CHECK_POLICY=OFF
end

if DATABASE_PRINCIPAL_ID('USERNAME') is null
begin
use [DBNAME]
CREATE USER USERNAME
Grant Insert,Update,Delete,Execute,Select,Create Procedure to USERNAME
end


DBNAME = Database Name
USERNAME = User Login Name
PASSWORD = Password for the DB Login

Creating Word Document from Byte Array and Viceversa

//Reading a Word Document and Converting to Byte Array (Can Be Saved to DB)
byte[] myByteArray = System.IO.File.ReadAllBytes(Request.PhysicalApplicationPath + "\\document\\Test.doc");

//Converting the Byte Array to a WordDocument Again (Retrieved from DB)
FileStream fs = new FileStream(Request.PhysicalApplicationPath + "\\document\\Test2.doc", FileMode.Create, FileAccess.ReadWrite);
BinaryWriter bw = new BinaryWriter(fs);
bw.Write(myByteArray);
bw.Close();

Thursday, May 13, 2010

Convert DataTable Column into String Array without Looping

Here ColumnName is the Specific Column in the Datatable

String[] rowValuesForColumn = Array.ConvertAll(dataTable.Select(),
delegate(DataRow row) { return (String) row[columnName]; });

Monday, April 26, 2010

Getting the Numerics from a String Value

Declare @sVal varchar(100)
Select @sVal= 'Here is where15234Numbers'
Select @sVal= SubString(@sVal,PATINDEX('%[0-9]%',@sVal),Len(@sVal))
Select @sVal= SubString(@sVal,0,PATINDEX('%[^0-9]%',@sVal))
Select @sVal

OutPut
-------
15234

if the string is 'Here is where15.234Numbers'
Then use
Select @sVal= SubString(@sVal,0,PATINDEX('%[^0-9,.]%',@sVal))

OutPut
------
15.234

Tuesday, April 20, 2010

Getting the Date Difference in Years, Months and Days

CREATE PROCEDURE dbo.CalculateAge
@dayOfBirth datetime
AS

DECLARE @today datetime, @thisYearBirthDay datetime
DECLARE @years int, @months int, @days int

SELECT @today = GETDATE()

SELECT @thisYearBirthDay = DATEADD(year, DATEDIFF(year, @dayOfBirth, @today), @dayOfBirth)

SELECT @years = DATEDIFF(year, @dayOfBirth, @today) - (CASE WHEN @thisYearBirthDay > @today THEN 1 ELSE 0 END)

SELECT @months = MONTH(@today - @thisYearBirthDay) - 1

SELECT @days = DAY(@today - @thisYearBirthDay) - 1

select @thisYearBirthDay
SELECT @years [Years], @months [Months], @days [Days]

Wednesday, March 31, 2010

Getting Integer value from Varchar Column

Declare @str varchar(20)
Set @str = 'SARAN01'
select Substring(@str,PATINDEX('%[0-9]%',@str),len(@str))

OUTPUT
-------
01

Monday, March 22, 2010

Adding CSS effect to AJAX Calendar Extender Control

Calendar Stylesheet
====================
.Cal_Theme .ajax__calendar_container
{
background-color: #EDCF81; border:solid 1px #cccccc;
}

.Cal_Theme .ajax__calendar_header
{
background-color: #FFFFEA; margin-bottom: 4px;
}

.Cal_Theme .ajax__calendar_title,
.Cal_Theme .ajax__calendar_next,
.Cal_Theme .ajax__calendar_prev
{
color: #004080; padding-top: 3px;
}

.Cal_Theme .ajax__calendar_body
{
background-color: #FFFFEA; border: solid 1px #cccccc;
}

.Cal_Theme .ajax__calendar_dayname
{
text-align:center; font-weight:bold; margin-bottom: 4px; margin-top: 2px;
}

.Cal_Theme .ajax__calendar_day
{
text-align:center;
}

.Cal_Theme .ajax__calendar_hover .ajax__calendar_day,
.Cal_Theme .ajax__calendar_hover .ajax__calendar_month,
.Cal_Theme .ajax__calendar_hover .ajax__calendar_year,
.Cal_Theme .ajax__calendar_active
{
color: #FFFFFF; font-weight:bold; background-color: #4A89B9;
}

.Cal_Theme .ajax__calendar_today
{
font-weight:bold;
}

.Cal_Theme .ajax__calendar_other,
.Cal_Theme .ajax__calendar_hover .ajax__calendar_today,
.Cal_Theme .ajax__calendar_hover .ajax__calendar_title
{
color: #000000;
}


---------------------------------------------------------------------------
Copy and paste the above stylesheet in one CSS file and Call to the control.

For Ex:
Add the below line in Head Section
<link href="../CSS/Calendar.css" rel="stylesheet" type="text/css" />


<cc1:CalendarExtender ID="txtdate_CalendarExtender" runat="server" Enabled="True"
CssClass="Cal_Theme" TargetControlID="txtdate">


OR


Use this Method to set the style for all Calendar extenders in the application

private void CheckExtenderControls(ControlCollection controlColl)
{
foreach (Control ctrl in controlColl)
{
if (ctrl.HasControls())
{
CheckExtenderControls(ctrl.Controls);
}
else
{
if (ctrl is AjaxControlToolkit.CalendarExtender)
{
AjaxControlToolkit.CalendarExtender calExt = (AjaxControlToolkit.CalendarExtender)ctrl;
calExt.CssClass = "Cal_Theme";
}
}
}
}


Thursday, March 11, 2010

Crystal Report Binding using C#

For Crystal Report binding we can use this below code.

Parameters to be Passed
1. dsGlobal - Containing the Data for the Main and SubReport.
(We need to pass a Dummy Datatable if we dont have Databinding in Main Report apart from MainReport)
2. SFormName - The Crystal Report Name
3. sNamespace - To get the Full Path of the Crystal Report from a Project. If not remove this and give the full path in sFormName

This will create a temporary report and bind it with the Crystal report viewer.


private void ViewReport(DataSet dsGlobal, string sFormName, string sNamespace)
{
CrystalDecisions.Windows.Forms.CrystalReportViewer lobjReportViewer;
try
{
CrystalDecisions.Shared.DiskFileDestinationOptions lobjDFDO = new CrystalDecisions.Shared.DiskFileDestinationOptions();
CrystalDecisions.Shared.ExportOptions lobjOptions = new CrystalDecisions.Shared.ExportOptions();
ReportDocument lobjReport = new ReportDocument();

Assembly objAssembly = AppDomain.CurrentDomain.Load(sNamespace); ;
object objForm = null;
foreach (Type t in objAssembly.GetTypes())
{
if (t.Name.ToUpper() == sFormName.ToUpper())
{
objForm = Activator.CreateInstance(t);
break;
}
}
ReportDocument lobjDriverReport = (ReportDocument)objForm;
lobjReportViewer = new CrystalReportViewer();

if (lobjDriverReport.Subreports.Count > 0)
{
foreach (ReportDocument subrep in lobjDriverReport.Subreports)
{
if (dsGlobal.Tables[subrep.Name] != null)
{
lobjReport = lobjDriverReport.OpenSubreport(subrep.Name);
lobjReport.Database.Tables[0].SetDataSource(dsGlobal.Tables[subrep.Name]);
}
}
}

if (dsGlobal != null && dsGlobal.Tables.Count > 0 && dsGlobal.Tables[0] != null && dsGlobal.Tables.Count > 0 && dsGlobal.Tables[0].Rows.Count > 0)
{
lobjDriverReport.SetDataSource(dsGlobal.Tables[0]);
}

lobjDFDO.DiskFileName = System.Environment.CurrentDirectory + "\\" + System.DateTime.Now.ToLongDateString() + "Report.rpt";

lobjOptions.ExportDestinationType = CrystalDecisions.Shared.ExportDestinationType.DiskFile;
lobjOptions.ExportFormatType = CrystalDecisions.Shared.ExportFormatType.CrystalReport;
lobjOptions.ExportDestinationOptions = lobjDFDO;
lobjDriverReport.Export(lobjOptions);

lobjReport = new ReportDocument();
lobjReport.Load(System.Environment.CurrentDirectory + "\\" + System.DateTime.Now.ToLongDateString() + "Report.rpt");

rptStorage.ReportSource = lobjReport;
}
catch (Exception ex)
{
MessageBox.Show(ex.Message.ToString());
}
}

Mail Sending Source using System.Net.Mail

private void SendMail()
{
try
{
MailMessage mail = new MailMessage();
SmtpClient smtp = new SmtpClient();
mail.Body = "Hello";
mail.IsBodyHtml = true;
mail.From = new MailAddress(FROMMailID, FROMNAME);
mail.Subject = "Subject";
mail.To.Add("saravanan@dotnetsnippets.com");
if (Txtccaddr.Text.Trim().Length > 0)
mail.CC.Add(Txtccaddr.Text.Trim());
if (Txtbccaddr.Text.Trim().Length > 0)
mail.Bcc.Add(Txtbccaddr.Text.Trim());
mail.Priority = MailPriority.High;

smtp.Host = HOST IP;
smtp.Port = 25;
smtp.Send(mail);
}
catch (Exception ex)
{

}
}

Tuesday, March 2, 2010

Centralise Date Format based on Regional and Language Setting

Datetime Format issues are the main thing that comes with Asp.Net application because of the Hosting Environment. If you have configured your application to run with default format of (MM/dd/yyyy) this would work fine with default setting in Regional & Language settings. If the format is changed the whole application ends up with Date Format errors. To overcome this we have a option which can be used to host the application in any environment without worrying for Date Format especially with LAPTOPS

using System.Globalisation;

public DateTime GetDateValue(string sDate, bool IsLongDate)
{
DateTime dt;
if (IsLongDate)
dt = DateTime.ParseExact(sDate, CultureInfo.CurrentCulture.DateTimeFormat.ShortDatePattern.ToString() + " " + CultureInfo.CurrentCulture.DateTimeFormat.LongTimePattern.ToString(), CultureInfo.CurrentCulture, DateTimeStyles.NoCurrentDateDefault);
else
dt = DateTime.ParseExact(sDate, CultureInfo.CurrentCulture.DateTimeFormat.ShortDatePattern.ToString(), CultureInfo.CurrentCulture, DateTimeStyles.NoCurrentDateDefault);
return dt;
}

public string GetDBDateValue(string sDate, bool IsLongDate)
{
DateTime dtDBDate;
DateTime dt = GetDateValue(sDate, IsLongDate);
if (!IsLongDate)
{
dtDBDate = new DateTime(dt.Year, dt.Month, dt.Day);
return dtDBDate.ToString("d", CultureInfo.CreateSpecificCulture("en-us"));
}
else
{
dtDBDate = new DateTime(dt.Year, dt.Month, dt.Day, dt.Hour, dt.Minute, dt.Second);
return dtDBDate.ToString("G", CultureInfo.CreateSpecificCulture("en-us"));
}
}


In these the First Function is used to retrieve the Date as per the format specified in Regional Settings.

EX: string sDate = "22/03/2010";
Datetime dtFormatedDate = GetDateValue(sDate , true)
OUTPUT : [dtFormatedDate = 22/03/2010 12:00:00 a.m;] In a Datetime format even if the day comes first

This can be used anywhere in your source and the C# predicts the Day, Month and Year respectively.

But in case of SQL if you pass the same format that would throw an error of Invalid Date format. In such case use the Second function which just makes the DATE FORMAT appropriate to SQL Server format.

EX: string sDate = "22/03/2010";
string sFormatedDate = GetDBDateValue(sDate , false)
OUTPUT : [sFormatedDate = 03/22/2010;]

Friday, February 12, 2010

Create dynamically a User to Local User and Groups in C#

public void CreateUserAccount(string login, string password, string fullName, bool isAdmin)
{
try
{
DirectoryEntry dirEntry = new DirectoryEntry("WinNT://" + Environment.MachineName + ",computer");
DirectoryEntries entries = dirEntry.Children;
DirectoryEntry newUser = entries.Add(login, "user");
newUser.Properties["FullName"].Add(fullName);
newUser.Invoke("SetPassword", password);
newUser.CommitChanges();

// Remove the if condition along with the else to create user account in "user" group.
DirectoryEntry grp;
if (isAdmin)
{
grp = dirEntry.Children.Find("Administrators", "group");
if (grp != null) { grp.Invoke("Add", new object[] { newUser.Path.ToString() }); }
}
else
{
grp = dirEntry.Children.Find("Guests", "group");
if (grp != null) { grp.Invoke("Add", new object[] { newUser.Path.ToString() }); }
}

}
catch (Exception ex)
{

}
}


To Check for the User exists please refer the Prev posts on [checking Logon User Exists]

For Further Scripts on Logon User/Group management
Click Here
Click Here